
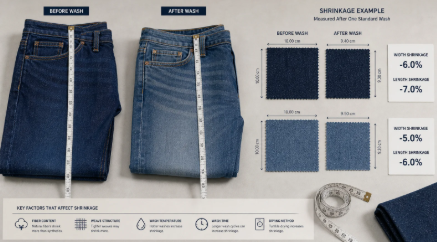
Shrinkage is one of the most important dimensional-control issues in apparel production.
It is also one of the easiest problems to oversimplify.
A fabric may be reported as having a certain shrinkage percentage, and that number may then be used to adjust the garment pattern.
But successful shrinkage control requires much more than a single test result.
Fabric can change between development and bulk production. Sewing construction can affect how a garment behaves after washing. Washing conditions can change the final dimensions. And the finished garment may not shrink uniformly in every direction or at every measurement point.
For this reason, shrinkage should not be managed as a single number.
Shrinkage should be managed as a production history from fabric development through bulk garment production.
The objective is to understand how the material and finished garment behave at each stage—and to identify why they change before those changes are built into the production pattern.
Start Building Shrinkage History During Development
Shrinkage control should begin before bulk fabric reaches the garment factory.
The first available sample fabric provides an initial reference point.
But that first result should not automatically become the permanent shrinkage value for the entire order.
As production develops, additional fabric becomes available.
A practical shrinkage history may include results from:
- Initial sample fabric
- First production lot or first-lot sample
- Bulk production fabric sample
- In-factory bulk fabric samples
- Additional lots where relevant
Each result should be recorded and compared with the previous stage.
The purpose is not simply to collect more test reports.
It is to identify whether the fabric is behaving consistently as the order moves from development toward actual production.
One Shrinkage Result Is Not a Production History
Suppose the original sample fabric shows one shrinkage result and a later production lot shows a noticeably different result.
The difference matters.
If only the latest number is recorded, the production team knows what happened—but not necessarily whether the result is stable or why it changed.
A history allows the team to see the movement.
For example:
Sample Fabric → First Lot → Bulk Sample → Factory Bulk
If the results remain reasonably consistent, confidence in the production assumption increases.
If the results begin moving significantly, the change becomes a signal that something should be investigated.
The value of shrinkage history is therefore not only in the individual numbers.
It is in the comparison between stages.
Always Check Shrinkage in Both Length and Width
Fabric does not necessarily shrink equally in every direction.
This is why describing a fabric simply as having “5% shrinkage,” for example, can be incomplete.
Lengthwise and widthwise dimensional changes should be checked separately.
A fabric may show relatively stable width while changing more significantly in length—or the opposite may occur.
Those differences matter because garment pattern pieces are oriented and constructed differently.
A change in length can affect body length, sleeve length, inseam, rise, and other vertical measurements.
A change in width can affect chest, waist, hip, sleeve width, leg width, and other horizontal measurements.
For production purposes, shrinkage should therefore be understood as directional information rather than one general percentage.
Length Shrinkage + Width Shrinkage = A More Useful Understanding of Fabric Behavior
Both should be recorded throughout the shrinkage history.
Shrinkage and Fabric Torque Should Be Checked Together
Shrinkage is not the only dimensional change that should be evaluated after washing.
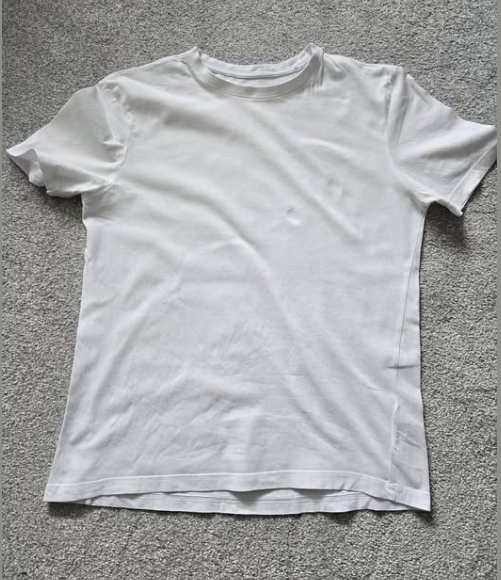
Fabric torque can cause a garment to twist or rotate after washing even when the basic length and width shrinkage results appear acceptable.
This is particularly important in knit garments, where yarn characteristics, knitting construction, fabric finishing, relaxation, and garment construction can all influence rotational behavior.
A garment may therefore meet its required chest width and body length after washing but still show an unacceptable appearance because the side seams have rotated or the body has twisted.
For this reason, dimensional stability should not be evaluated only by asking:
“How much did the garment shrink?”
It should also ask:
“Did the garment remain properly aligned after washing?”
Shrinkage and torque should therefore be evaluated together as part of the garment wash-test history.
Torque Should Be Evaluated on the Actual Garment
Fabric-level evaluation is useful, but the actual garment provides essential information about how torque appears in the finished product.
After washing, the garment should be laid and conditioned according to the applicable test or buyer procedure and checked for visible twisting or rotational displacement.
For example, a side seam that was positioned correctly before washing may move toward the front or back of the garment after washing.
The production team should record the applicable torque or spirality result according to the agreed measurement method and compare it with the required tolerance.
Just as with shrinkage, torque results should be tracked by stage:
Sample Fabric / Garment → First Lot → Bulk Fabric / Garment → In-Factory Production
If torque changes significantly between stages, the team should not immediately try to correct the garment pattern.
The cause should first be investigated.
Areas to review may include:
- Yarn characteristics and residual torque
- Knit construction
- Fabric knitting condition
- Fabric finishing and relaxation
- Lot-to-lot variation
- Garment panel orientation
- Sewing construction
- Wash and drying conditions
The objective is to determine whether the twisting originates primarily from the fabric, garment construction, washing process, or a combination of these factors.
A garment can meet its measurement specification and still fail dimensional stability if unacceptable torque causes the garment to twist after washing.
Fabric Shrinkage and Garment Shrinkage Are Not the Same Thing
Fabric shrinkage testing provides essential information about the material.
But the finished garment is not simply a flat piece of fabric.
Once fabric is cut and sewn, it becomes a constructed product.
Seams join different pieces together.
Stitching introduces thread and mechanical tension.
Different parts of the garment may contain different seam structures, attachments, trims, elastic, rib, interlining, or other components.
The garment then goes through washing as a three-dimensional constructed product.
For this reason:
Fabric shrinkage tells you how the material changes. Actual garment wash testing tells you how the product changes. Apparel production needs both.
A fabric test should therefore not replace an actual garment wash test.
Actual Garment Wash Tests Should Be Performed by Stage
Just as fabric shrinkage should be tracked from development through bulk production, actual garment wash results should also be recorded throughout the relevant stages.
The purpose is to understand whether the garment continues to behave as expected as materials and production conditions become closer to bulk manufacturing.
Depending on the product and production process, garment wash-test history may include development samples, later approval samples, first-lot or production samples, and garments made from actual bulk fabric.
The exact sample stages may vary by order.
The principle does not.
Do not rely on one early garment wash test to represent every later production condition.
Each meaningful stage provides another opportunity to confirm that the production assumption remains valid.
Measure the Garment Before and After Washing
An actual garment wash test should provide more information than a general statement that the garment “shrunk.”
The garment should be measured before washing and measured again after the applicable wash process.
The resulting changes can then be evaluated by Point of Measurement, or POM.
Depending on the garment, relevant POMs may include:
- Chest or body width
- Body length
- Shoulder width
- Sleeve length
- Sleeve opening
- Waist
- Hip
- Front rise
- Back rise
- Inseam
- Outseam
- Leg opening
Not every garment requires the same POMs.
The important point is to evaluate the actual dimensions that determine the garment’s fit and specification compliance.
A useful sequence is:
Before-Wash Measurement → Wash Process → After-Wash Measurement → Change by POM → Compare With Finished Specification and Tolerance
This provides much more useful production information than a single overall shrinkage percentage.
Garment Construction Must Be Part of the History
When garment wash results are recorded, the garment construction used for that sample should also be understood.
This is important because sewing construction can influence dimensional behavior.
Changes in seam construction, stitch type, thread condition, sewing tension, attachments, or assembly method may affect how different parts of the garment respond after washing.
If a wash-test result changes between sample stages, the production team should therefore ask:
Was the garment constructed the same way?
Without construction history, it may be difficult to determine whether a dimensional change came from the fabric or from the way the garment was sewn.
Shrinkage records become much more valuable when the test result can be connected to the actual garment construction that produced it.
Washing Method Must Also Be Controlled and Recorded
The wash process is the third major part of shrinkage history.
Two garment samples made from the same fabric and construction may produce different dimensional results if the washing process changes.
The applicable process may involve variables such as:
- Wash program
- Water temperature
- Wash time
- Drying method
- Drying temperature
- Mechanical action
- Number of wash cycles
- Relaxation or conditioning
- Garment-processing requirements
The exact variables depend on the product and wash requirement.
The key management principle is consistency and traceability.
If a sample produces a particular shrinkage result, the production team should know how that sample was washed.
Otherwise, a later difference may be incorrectly blamed on the fabric or pattern when the actual change came from the wash process.
Manage Three Histories Together
Effective shrinkage control therefore requires more than a shrinkage chart.
Three histories should be understood together:
Fabric History
What material was used, and how did its dimensional behavior change?
Garment Construction History
How was the garment sewn and assembled at that stage?
Wash Process History
What washing and drying process produced the final result?
Together, these histories create a much more useful production record:
Fabric Condition → Garment Construction → Wash Process → Shrinkage & Torque → Finished Garment Measurement and Appearance
When one result changes, the team has a structured way to investigate why.
Do Not Change the Pattern Simply Because the Shrinkage Number Changed
This is one of the most important principles in shrinkage management.
Suppose the original fabric sample shows one shrinkage result and a later bulk sample shows another.
The immediate reaction should not automatically be:
“Change the pattern.”
First determine why the number changed.
Pattern adjustment should be based on a production condition that is understood and expected to continue—not on an unexplained test result.
Otherwise, the pattern may be modified to compensate for a temporary or incorrect condition.
When that condition changes again, the adjusted pattern can create a new measurement problem.
Do not change the pattern simply because the shrinkage number changed. First determine what changed in the fabric, garment construction, or washing process—and then decide what should be reflected in the production pattern.
Step 1: Check the Fabric
When shrinkage changes unexpectedly, begin with the material.
Compare the current fabric with the previous approved or tested condition.
Depending on the fabric, areas to review may include:
- GSM or fabric weight
- Knit or woven construction
- Yarn or material characteristics
- Fabric width
- Finishing condition
- Lot differences
- Relaxation condition
- Other relevant physical characteristics
For example, a change in fabric weight, construction, or finishing may indicate that the material entering the new test is not behaving exactly like the earlier sample.
If the fabric itself has changed, changing the garment pattern before understanding that material change may hide the real problem rather than solve it.
For more on how fabric weight affects garment quality, consumption, and production, see Fabric GSM Explained: How Fabric Weight Affects Garment Cost and Production.
Step 2: Check the Garment Sewing Construction
If the material condition appears consistent, compare the garment construction.
Was the same seam construction used?
Were the same sewing methods followed?
Did stitch or thread conditions change?
Was a different attachment or assembly method used?
Was the sample produced under conditions representative of bulk production?
The objective is not to assume that sewing caused the dimensional change.
It is to eliminate or identify construction as a variable before making a pattern decision.
Step 3: Check the Wash Method and Conditions
Next, verify the wash process.
Was the same wash procedure followed?
Were wash and drying conditions consistent with the previous test?
Was the correct program used?
Was the sample processed under the intended production or testing condition?
If the wash method changed, the resulting shrinkage may also change.
A pattern should not be altered to compensate for an accidental or inconsistent wash process.
The wash condition must first be confirmed.
Then Decide What Belongs in the Pattern
Only after the fabric, sewing construction, and wash process have been reviewed should the production team determine what dimensional behavior needs to be reflected in the pattern.
The purpose of shrinkage allowance is not to correct every test variation.
It is to anticipate the expected dimensional change of the garment under the confirmed production condition.
That distinction matters.
A good production pattern should reflect the behavior of the material and garment process that will actually be used in bulk production.
It should not become a place where unexplained production variation is repeatedly absorbed.
Pattern Correction Should Consider Direction and POM
Because shrinkage can differ between length and width, pattern correction should not be treated as one uniform percentage applied to every dimension.
Likewise, actual garment results may show different dimensional behavior at different POMs.
The production team should evaluate how the confirmed shrinkage affects the garment’s actual construction and finished measurements.
The objective is to achieve the approved after-wash specification—not simply to make the pre-wash garment larger by a general percentage.
This becomes especially important for products where wash processing is a major part of the finished garment appearance and fit.
Verify the Decision With an Actual Garment
A pattern adjustment based on confirmed shrinkage should not remain a theoretical calculation.
The adjusted pattern should be verified through an actual garment.
That garment should be constructed using the intended production method, processed using the applicable wash method, and measured against the required finished specification.
This closes the loop between:
Test Result → Analysis → Pattern Decision → Actual Garment Verification
If the garment meets the required measurement and appearance after washing, confidence in the production setup increases.
If it does not, the team still has an opportunity to investigate before the problem expands through bulk production.
Bulk Fabric Must Still Be Checked
Approval of a development sample does not eliminate the need to monitor bulk fabric.
Bulk production may involve different lots, larger processing quantities, and normal production variation.
Samples should therefore be taken from actual bulk fabric according to the production requirement and compared with the established history.
The question is not simply:
“Does this bulk fabric pass?”
It is also:
“Is this bulk fabric behaving consistently with the material and garment assumptions used to approve the production pattern?”
That comparison is what connects shrinkage testing to actual production control.
For more on evaluating bulk fabric before it enters garment production, see Fabric Inspection and the 4-Point System: How to Control Fabric Quality Before Cutting.
Bulk Garments Should Confirm the History
The same principle applies after bulk garment production begins.
Actual production garments provide the final confirmation that fabric behavior, sewing construction, wash processing, and pattern allowance are working together as expected.
Bulk garment wash results should be compared with the earlier approved history.
If a significant change appears, it should be investigated quickly.
Waiting until final inspection to discover a dimensional problem can make corrective action extremely difficult.
By that point, large quantities may already have been sewn, washed, finished, or packed.
Shrinkage control is most effective when it identifies change early.
For more on controlling garment quality throughout production and before final shipment, see Apparel Quality Inspection: From Cut Pieces to Final AQL Inspection.
Why Shrinkage History Matters for Quality
A garment can look visually acceptable and still fail measurement after washing.
Dimensional instability can affect:
- Fit
- Size consistency
- Buyer specifications
- Garment appearance
- Quality inspection
- Customer satisfaction
- Claims and returns
A documented shrinkage history helps production teams distinguish normal expected behavior from unexpected variation.
It also gives technical, quality, sourcing, and production teams a common reference when investigating a problem.
Instead of asking everyone to remember what happened during an earlier sample stage, the production record provides the evidence.
Why Shrinkage History Matters for Cost
Shrinkage is also a costing issue.
Pattern allowance can affect fabric consumption.
Unexpected shrinkage can require pattern changes.
Failed wash tests can require additional samples.
Bulk dimensional problems can create repair, replacement, sorting, reprocessing, or rejected garments.
In severe cases, the factory may need additional fabric or production time to recover the order quantity.
A small dimensional-control problem can therefore become a significant commercial problem when multiplied across a large order.
This is another reason shrinkage should be managed before it becomes a final-inspection issue.
Do Not Let Different Departments Manage Different Versions of the Truth
Shrinkage control crosses several departments.
Fabric teams may hold material test results.
Pattern teams may hold shrinkage allowances.
Sample rooms may hold garment measurements.
Wash facilities may hold processing information.
Quality teams may hold bulk test results.
If these records are not connected, different departments may make decisions using different assumptions.
A more effective system creates one traceable history that connects:
Fabric → Pattern → Sewing → Washing → Measurement → Bulk Production
This makes it easier to identify when and where a change occurred.
It also reduces the risk of correcting the wrong part of the process.
Shrinkage Control Is Change Control
Ultimately, good shrinkage management is not about finding one perfect percentage.
It is about controlling change.
As an order moves from development to production, materials and processes become more representative of bulk manufacturing.
At every important stage, the production team should ask:
What changed?
Did the shrinkage change?
Did the fabric change?
Did the construction change?
Did the wash process change?
Did the finished garment measurements change?
When those questions are supported by recorded history, decisions become much more reliable.
Final Takeaway
Shrinkage should never be managed as a single percentage taken from one fabric test.
A reliable production approach builds shrinkage history from the earliest fabric sample through first-lot and bulk fabric, and continues that history through actual garment wash testing.
Length and width shrinkage should always be evaluated separately.
Fabric torque should also be evaluated, particularly for products where rotational distortion may affect garment appearance after washing. An acceptable shrinkage result alone does not guarantee acceptable dimensional stability.
Actual garments should be measured before and after washing at the relevant POMs.
Garment construction should be recorded.
Wash methods and conditions should be recorded.
And when shrinkage changes, the production team should investigate the cause in the correct order:
Fabric → Sewing Construction → Wash Process → Pattern Decision
Only after the production condition is understood should the confirmed dimensional behavior be reflected in the pattern.
The resulting decision should then be verified through an actual garment and monitored again during bulk production.
The goal is not simply to know the shrinkage percentage. The goal is to understand why the garment changes, control that change, and consistently achieve the required finished garment specification in bulk production.
Need Help With Shrinkage Control & Garment Production?
Apparel Production Lab provides practical consulting for fabric evaluation, garment development, shrinkage control, pattern and specification management, quality control, and apparel production.
Whether you need help building a shrinkage-control process, reviewing fabric and garment wash-test history, investigating dimensional variation, or connecting shrinkage results with production patterns and bulk quality, we can help develop a practical approach around your product and production requirements.